To ensure a proper usage of images, videos across the web page, each single uploaded file must be combined with an Entry of one of these specific Content Types:
Image
Video
💡For embedding an image, video into a website page, you must reference an Entry of the appropriate Content Type. It is not possible to directly include them into a web page.
In the mentioned Content Types, there are some fields for additional information related to the uploaded file.
In case of images and videos, this is information regarding copyright, usage right etc.
1. How to upload new images and videos
In the following description in this page, we will concentrate on images. Uploading and embedding videos follow the same steps. The maintenance of documents will be described in an own section of the manual.
1st Step: Create an Entry
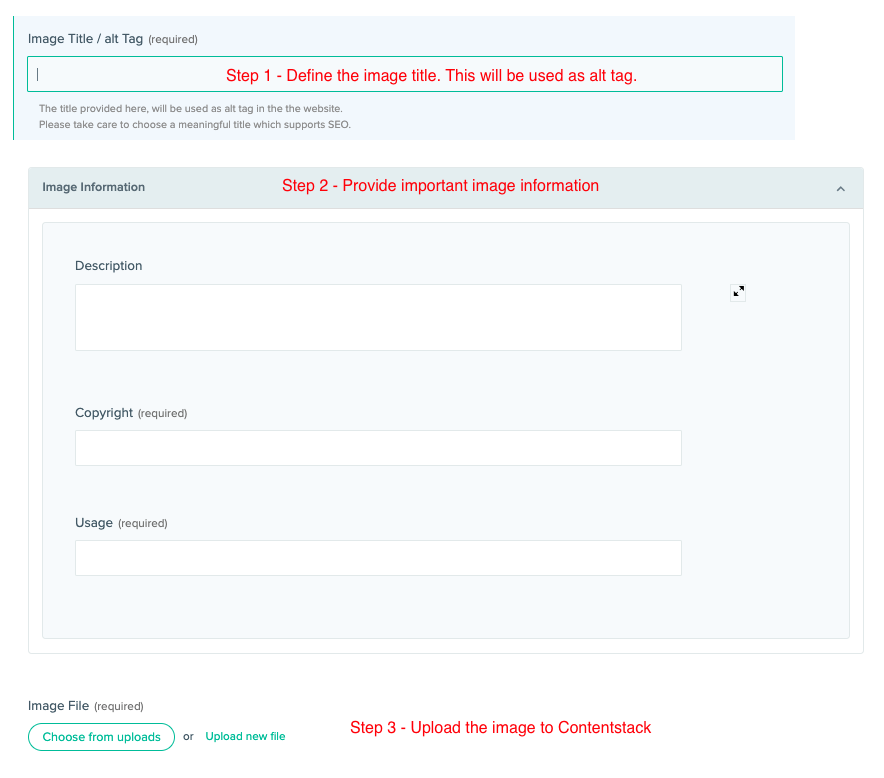
Select the Content Type “Image” or “Video” from the list of Content Types and click “+ New Entry” at the top right. In the form that opens, please provide
An internal name →
 In case of “Image” this title will be used as alt tag!
2nd Step: Provide important image information
Description (optional)
Copyright (mandatory)
Usage information (mandatory
3rd Step: Add the File
In the Entry form, click “Upload new file” to select the image from your local computer and to upload it.
(If you have already uploaded the file directly to the Assets library, click “Choose from uploads”.)
4th Step: Save the Entry
After completing the entry form and uploading the asset, you can save the Entry.
Now, you can reference the Entry in a Content Block or wherever needed.
2. How to change an image or video
Basically, there may be two reasons why an image (or a video) must be changed.
Case 1 - change an image only for a specific Web Page / Content Block
The image is the wrong one for the specific webpage, it belongs to another page. → The image has to be kept and the connected Content Type Entry should not be changed.
Select in the Content Type where the image has been embedded (e.g. in Content Blocks) another Entry of “Image” or create a new one.
→ Click the cross icon at the right of the reference and click either “Choose an existing entry” or “Create a new entry”.Leave the Entry of “Image” that has been referenced before unchanged.
Case 2 - change an image in all places
The image itself is wrong, maybe a preliminary version. → The image should not be used in any page and should be updated in all places.
Be careful with changing of an image in all places! We recommend to check if the Entry is referenced in multiple places beforehand. → https://freshcells.atlassian.net/wiki/spaces/MFADEXT/pages/2532933791
Open the Entry in “Image” with the wrong image file and change the file.
→ Click the edit icon at the right of the reference. The detail view of the asset opens in the Assets library. In here, click “change file”.(optional) To keep Assets clean, search for the misleading file in Assets and delete it.
These steps apply identical to videos.
Understanding the Contentstack Asset Library
If you upload an image, a video or any document to Contentstack, this upload will be stored in the Assets library in Contentstack.
The Assets library behaves a bit like a file explorer. You can add folders to organize the assets and there are a few options to add e.g. a description directly to the uploaded asset. We ignore these options to provide information about the uploaded assets.
Even if Contentstack provides an option to directly upload files to the Assets library, please do not, but follow the steps described above.
Going this way, always causes the risk of forgetting a step and so, to lose required information, like e.g. the copyright data. Furthermore, you cannot include assets (images and videos) into a web page until the image or video is embedded into an Entry of the Content Types “Image” or “Video”!
There are a few reasons to first upload the assets and to create the needed Entries in a second step. One reason may be, if a dedicated Central Admin needs to upload several assets (mainly documents) in one go.
Where am I?
When you work with Assets, you’re touching two different sections of Contentstack. Please take care that you always are aware in which section you are!
Content Types


Check the menu with the red background. The active section is highlighted. Below the breadcrumb starts with “Content Types”.
Assets


The breadcrumb start with “Assets”.

In the detail view of an asset, the form always looks the same.